Portmone eCommerce Android SDK
Glossary
| Term | Definition |
|---|---|
| Merchant, Online Store or Partner | Organization which has signed a payment acceptance agreement with Portmone.com |
| Buyer, Client or Customer | A person who visits the Merchant's Online Store in order to learn about the range of goods (services) and to make a purchase |
| Card, Payment Card | Payment cards of Visa, Mastercard international card associations and the National payment system PROSTIR |
| Token | A unique digital identifier of a card, which is generated during the first operation and then used for quick payment |
| CVV2/CVC2 | CVV2 (Card Verification Value 2) is a three-digit card security code that helps to verify legitimacy of a Visa payment card. The MasterCard payment system has similar card security code called CVC2 (Card Validation Code 2) |
| Authorization | The procedure of obtaining confirmation from the issuing bank to make a payment by card |
| Biometric authorization | The process of payment confirmation using biometric data (e.g. fingerprint) identification technology |
| Issuing Bank (Card Issuing Bank) | A bank licensed as a member of a card association (like Visa or Mastercard), that issues and maintains payment cards |
| 3-D Secure | 3-D Secure is a protocol which is used for secure handling of online bank card payments |
General description
Portmone SDK supports Android 5.0 version, API level 21 and above.
Integration
settings.gradle (project level)
pluginManagement {
   repositories {
       gradlePluginPortal()
       google()
       mavenCentral()
   }
}
dependencyResolutionManagement {
   repositoriesMode.set(RepositoriesMode.FAIL_ON_PROJECT_REPOS)
   repositories {
       google()
       mavenCentral()
       jcenter()
       maven {
           url "https://github.com/Portmone/Android-e-Commerce-SDK/raw/master/"
       }
   }
}
rootProject.name = "TestSDK_v3" include ':app'
build.gradle (project level)
allprojects {
   repositories {
       google()
       jcenter()

       mavenCentral()
       maven {
           url "https://github.com/Portmone/Android-e-Commerce-SDK/raw/master/"
       }

   }
}
build.gradle (app level)
dependencies {
       implementation 'com.portmone.ecomsdk:ecomsdk:1.3.4'
}
The SDK has a logic that allows you to safely remove the card_io library from dependencies (function is available for SDK version 1.3.0 and higher).
build.gradle (app level)
dependencies {
       implementation ('com.portmone.ecomsdk:ecomsdk:2.2.5'){
            exclude group: 'io.card'
       }
}
In this case, card scanning functionality will be removed from the SDK UI, which allows to reduce the size of the application.
If you use proguard you need to add next row: keep class com.portmone.ecomsdk.** { *; }
Usage scenarios
- Payment by card.
- Saving a card.
- Payment by token (card token can be obtained using scenario 1 or 2).
- Money transfer from card to card using sender’s card token.
- Fingerprint payment confirmation.
- Payment via Google Pay.
- Mass payment of utility bills.
Software interface description
1. Language setting
SDK provides possibility to localize system text and responses from the server using this method:
PortmoneSDK.setLanguage(languageСode);
The method uses a constant from the Constant$Language.* class as the parameter to set Ukrainian, English or Russian language. If this function was not called, the language set at the system level will be used. If the translation according to the system language was not found, the Ukrainian language will be used.
2. Screen styles
For the screens used in the SDK, the elements and font colors as well as the text color can be changed using the AppStyle class. The class contains a set of parameters that are responsible for certain elements on the screens. Only the required parameters can be filled in. All colors are set in hex format.
To specify styles, use the following function:
PortmoneSDK.setAppStyle(...);
The specified styles are saved until the application shuts down.
App style
| Field | Type | Description |
|---|---|---|
| background | int | Screens background color |
| toolbar | int | Toolbar color on all screens |
| iconSuccess | int | Changes the successful payment icon (available for SDK version 1.2.1 and higher) |
| iconError | int | Changes the failed payment icon (available for SDK version 1.2.1 and higher) |
| type | Constant$Type.* | This parameter is set using the values from the Constant$Type file. There are three options: 1. Default – standard option; 2. Phone – the description title “Order description” is changed to “Phone number” and “+380” is added to the description value itself (available for SDK version 1.2.1 and higher) 3. Account – the description title “Order description” is changed to “Personal account number” (available for SDK version 1.3.3 and higher) |
| buttonStyle | ButtonStyle | Contains the button text color and the button background color in normal and clicked states, as well as the font for the button text |
| editTextStyle | EditTextStyle | Used for input fields. Allows to change the color of the main text, tips and errors, and the corresponding fonts |
| blockTitleTextStyle | BlockTitleTextStyle | Used for block headers on the screens. Allows to specify the background color, text color and font |
| titleTextStyle | TitleTextStyle | Allows to specify the color and font of the titles on the screens |
| descriptionTextStyle | TextStyle | Allows to specify the color and font of the main text on the screens |
| additionalInfoTextStyle | TextStyle | Allows to specify the color and font of the additional text on the screens |
| fingerprintButton | TextStyle | Allows to specify the color and font of the text for the fingerprint payment button (available for SDK version 1.1.4 and higher) |
| paymentSuccessDownload | TextStyle | Allows to specify the color and font of the receipt downloading button on the successful payment screen (available for SDK version 1.2.1 and higher) |
| dialogInfoStyle | DialogInfoStyle | Allows to specify the color and font of the title, text and the button text in the dialogs |
| paymentDivider | TextStyle | The color of the text separator between payment types (by Google Pay and by payment card) |
With version 2.2.5 of the SDK, the following style properties and a small change to the logic of the screens are available:
PortmoneSDK.setStandardResultFlow(false); - allows you to disable screens about the result of the operation from the SDK side. Then the result can be processed - see point 11.2
PortmoneSDK.setAdditionalCustomize(true); - additional customization of screens for card storage and card payment.
Additional customization of the card storage and card payment screens.
Card saving method PreAuthCardPreActivity
Standard text
PortmoneSDK.setDescriptionSaveCard("");
PortmoneSDK.setTitleSaveCard("");
No text
WalletSDK.setDescriptionSaveCard(" ");
WalletSDK.setTitleSaveCard(" ");
Custom text
PortmoneSDK.setDescriptionSaveCard("Save card");
PortmoneSDK.setTitleSaveCard("Do you want 100 million UAH?");
Saving the card by the PreAuthCardPreActivity method and paying by card by the CardActivity method
PortmoneSDK.setNameCompany("PORTMONE"); - establishment of the company name. WalletSDK.setUAHSymbol(true); - installation of UAH sign, instead of UAH after the amount.
appStyle.setIconPayment(R.drawable.ic_portmone); - you can set the company icon.
New stylization of input fields:
| Field | Description |
|---|---|
| EditTextStyleAdditional editTextStyleAdditional = new EditTextStyleAdditional(); | we create a new style |
| editTextStyleAdditional.setTextColor(Color.parseColor("#6A5ACD")); | text color |
| editTextStyleAdditional.setErrorTextColor(Color.parseColor("#90EE90")); | error color |
| editTextStyleAdditional.setHintTextColor(Color.parseColor("#C0C0C0")); | hint color |
| editTextStyleAdditional.setFocusedBorderColor(Color.parseColor("#7FFFD4")); | the frame is in focus, that is, when the user is typing something |
| editTextStyleAdditional.setUnfocusedBorderColor(Color.parseColor("#4682B4")); | the frame is not in focus, that is, when the user is on another element |
| editTextStyleAdditional.setSizeFocusedBorderThickness(4); | the thickness of the border of the input field, if the input field is in focus |
| editTextStyleAdditional.setSizeUnfocusedBorderThickness(2); | the thickness of the frame of the input field, if the input field is not in focus |
| editTextStyleAdditional.setSizeRoundedCornerShape(16); | rounding of the frame of the input field |
| appStyle.setEditTextStyleAdditional(editTextStyleAdditional); | add style to appStyle |
3. Custom UID setting
SDK allows you to set up your own UID (sales channel ID for custom settings; set by agreement with the Portmone.com manager). Use the setUid static method to do that:
PortmoneSDK.setUid("customUID");
UID (shop_site_ID).If there is no UID, don`t pass a value.
4. Confirmation of payment by fingerprint
(* function is available for SDK version 1.1.4 and higher)
SDK provides possibility to pay by token using a fingerprint scan to confirm payment. То enable this feature, the following should be used:
PortmoneSDK.setFingerprintPaymentEnable(true);
However, this feature is not available for transfer from token to card.
SDK checks the presence of a physical biometrics scanner and a stored fingerprint; if they are not available, this function will not work.
Please contact our Account Managers to activate biometric authorization
E-mail: [email protected]
5. Payment by card
5.1. Initialization of payment by card
To open (payment screen created at the SDK level (CardPaymentActivity ) you should by following methods
- via static method performTransaction;
- via Activity Result APIs.
5.1.1. Method performTransaction
This method is overloaded and takes Activity or Fragment as an argument.
In order to receive the payment Bill, an onActivityResult callback must be implemented in which the necessary intent identified using the requestCode.
performTransaction method parameters
| Parameter | Type | Description | Example |
|---|---|---|---|
| activity/fragment | Activity/Fragment | The Activity/Fragment object required to launch the payment screen and receive the payment result | |
| requestCode | int | A unique code to identify the result of the payment. It is required for onActivityResult callback | 123 |
| CardPaymentParams | CardPaymentParams | Object with a set of parameters required for the payment | |
| showReceiptScreen | boolean | Displaying a screen with the receipt after successful payment. Default value: true (* available for SDK version 1.3.2 and higher) | |
| returnToDetailsAfterErrorEnabled | boolean | Return to entering payment details after an error. Default value: false (* available for SDK version 1.3.4 and higher) |
CardPaymentParams object
| Field | Type | Description | Nullability |
|---|---|---|---|
| payeeId | String | A unique identifier (ID) of the payee company in the Portmone.com system | Nonnull |
| billNumber | String | A unique number of the payment | Nullable |
| shopBillId | String | Identifier of the invoice used to process a payment for an already created bill. If shopBillId is provided, the value of the preauthFlag parameter specified when creating the bill must match the value in the payment request. The shopBillId parameter must be placed after billNumber (or after payeeId if billNumber is not present). If shopBillId is not used, leave this field empty ("") — in this case, the system will work under standard settings. To correctly display the order number, payment description, and commission to the user, these details from the created shopBillId must also be duplicated in the parameters of the payment request. The use of this parameter is optional and required only when a payment is to be made for a previously created bill. | Nullable |
| preAuth | boolean | Payment with pre-authorization. Default value: false | Nullable |
| billCurrency | String | Currency of the payment. Only values from the Constant$BillCurrency set of constants are accepted. Possible values: UAH (default value), USD, EUR, GBP, KZT | Nullable |
| attribute1 | String | Payment attribute 1 | Nullable |
| attribute2 | String | Payment attribute 2 | Nullable |
| attribute3 | String | Payment attribute 3 | Nullable |
| attribute4 | String | Payment attribute 4 | Nullable |
| attribute5 | String | Payment attribute 5. Used to send the split parameters of the payment (see section "Splitting the payment" for details) | Nullable |
| billAmount | double | Amount of the payment | Nonnull |
| description | String | Payment description | Nullable |
| onlyGooglePay | boolean | Payments via Google Pay only | Nullable |
| testEnvironment | boolean | Using test environment for Google Pay | Nullable |
| emailAddress | String | Email address | Nullable |
| privatPayEnabled | boolean | Payment via the LiqPay system, with card selection from Privat24 Internet Banking. This parameter can only be used when invoking the constructor with Google Pay. If payment via LiqPay is not required, this parameter can be set to false. | Nonnull |
Note: The
attribute 1-5fields – optional fields for additional payment information.
Example:
final CardPaymentParams testParamsWithoutGooglePay = new PaymentParams(
    "1234",                 // payeeId
    "BILL-2025-0001",       // billNumber
    "2102095545",           // shopBillId
    false,                  // preAuth
    "UAH",                  // billCurrency
    "A1",                   // attribute1
    "A2",                   // attribute2
    "A3",                   // attribute3
    "A4",                   // attribute4
    "A5",                   // attribute5
    123.45,                 // billAmount
    "Test order 001",       // description
    "[email protected]"      // emailAddress
);

final CardPaymentParams testParamsWithGooglePay = new PaymentParams(
    "1234",                 // payeeId
    "BILL-2025-0001",       // billNumber
    "2102095545",           // shopBillId
    false,                  // preAuth
    "UAH",                  // billCurrency
    "A1",                   // attribute1
    "A2",                   // attribute2
    "A3",                   // attribute3
    "A4",                   // attribute4
    "A5",                   // attribute5
    123.45,                 // billAmount
    "Test order 001",       // description
    true,                   // onlyGooglePay
    false,                  // testEnvironment
    "[email protected]",     // emailAddress
    false                   // privatPayEnabled
);


CardPaymentActivity.performTransaction(
     this,
     111,
     testParamsWithGooglePay,
     false
);
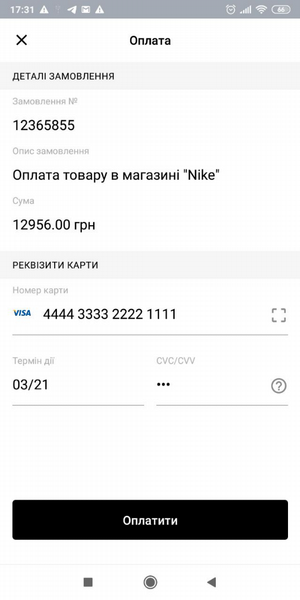
Fig. 1a. Card payment screen (without branding)
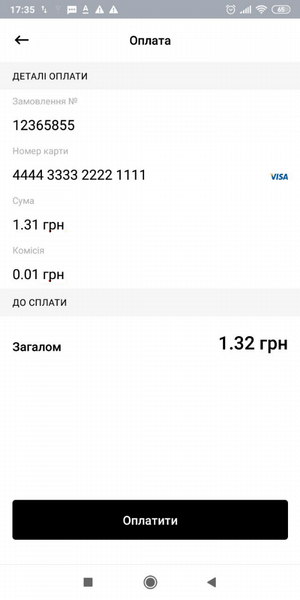
Fig. 1b. Card payment screen (without branding)
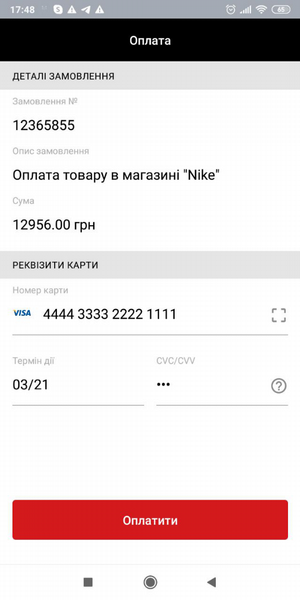
Fig. 2a. Card payment screen (branding example)
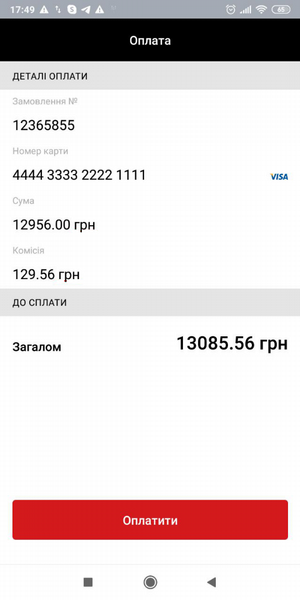
Fig. 2b. Card payment screen (branding example)

Fig. 2с. Card payment screen (example of custom branding)
5.1.2. Method Activity Result APIs
You must register the callback by calling the registerForActivityResult () method, which accepts the following parameters:
CardPaymentContract;ActivityResultCallback.
In ActivityResultCallback, you need to call the handleResult method, which can be used to process successful, erroneous payment results or cancel payment.
Parameters of the handleResult method
| Parameter | Type | Description |
|---|---|---|
| successHandler | PaymentResultHandler.Success | Callback to process a successful result in which you can get a Payment Bill and payment method (with or without Google Pay) |
| failureHandler | PaymentResultHandler.Failure | Callback to process an erroneous result |
| cancelHandler | PaymentResultHandler.Cancel | Callback for payment cancellation processing (for example, when the user closes the SDK screen) |
To run 'CardPaymentActivity', you must call the launch method by passing CardPaymentContractParams in the parameters.
Object CardPaymentContractParams object
| Parameter | Type | Description | Nullability |
|---|---|---|---|
| paymentParams | CardPaymentParams | A set of parameters required for payment | Nonnull |
| showReceiptScreen | boolean | Option to turn off the display of the receipt saving screen after successful payment (default true) (* option available from SDK version 1.3.2) | Optional |
| returnToDetailsAfterErrorEnabled | boolean | Parameter with which you can prevent the return to the entry of details after an error (default false) (* option available from SDK version 1.3.4) | Optional |
Example:
private ActivityResultLauncher<CardPaymentContractParams> resultLauncher = registerForActivityResult(
	new CardPaymentContract(),
	result ->
		result.handleResult(
	           (successResult) -> {
                      handleBill(successResult.getBill());
                 },
		     (failureResult) -> {
                      handleError(
                           failureResult.getCode(),
                           failureResult.getMessage()
                      );
                 },
                 () -> {
                      handlePaymentCancel();
                 }
            )
	);

@Override
protected void onCreate(Bundle savedInstanceState) {
	super.onCreate(savedInstanceState);
      …
      payButton.setOnClickListener (
            button -> resultLauncher.launch(
                         new CardPaymentContractParams(
      	                     cardPaymentParams,
	                           true,
      	                     false
                         )
            )
      );
}
5.2. Getting the result of payment by card
After a successful payment, the Bill object will be created containing payment information.
6. Saving a card
The card saving mechanism provides the possibility to get the token value for further payment by this card without entering the payment card number and expiration date. To receive the token 1 UAH is blocked at the client's card account. Unblocking takes place automatically within 30 minutes.
6.1. Initialization of card saving
To open payment screen created at the SDK level (PreauthCardActivity) you should by following methods
- via static method performTransaction;
- via Activity Result APIs.
6.1.1. Method performTransaction
This method is overloaded and takes Activity or Fragment as an argument.
performTransaction method parameters
| Parameter | Type | Description | Example |
|---|---|---|---|
| activity/fragment | Activity/Fragment | The Activity/Fragment object required to launch the payment screen and receive the payment result | |
| requestCode | int | A unique code to identify the result of the payment | 123 |
| params | SaveCardParams | Object with a set of parameters required for the card saving |
SaveCardParams object
| Field | Type | Description | Nullability |
|---|---|---|---|
| payeeId | String | A unique identifier (ID) of the payee company in the Portmone.com system | Nonnull |
| billNumber | String | A unique number of the payment | Nullable |
| description | String | Payment description | Nonnull |
Example:
final SaveCardParams testParams = new SaveCardParams(
     "1111",
     "test description",
     "test bill number"
);

PreauthCardActivity.performTransaction(
     this,
     113,
     testParams
);
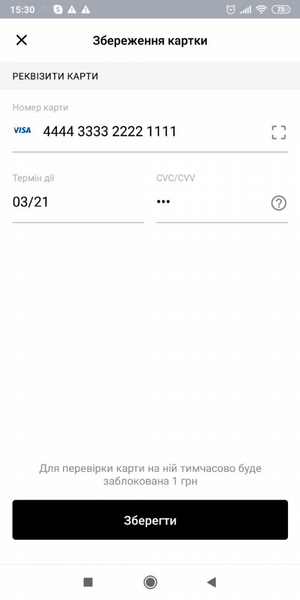
Fig. 3. Card saving screen (without branding)
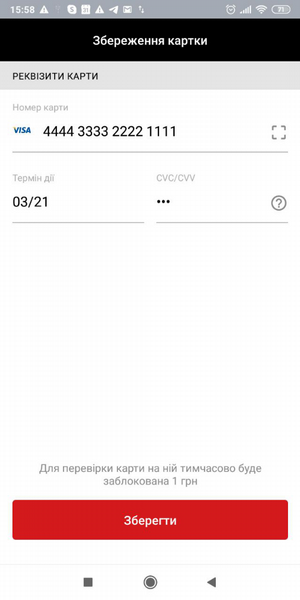
Fig. 4. Card saving screen (branding example)

Fig. 4a. Card saving screen (example of custom branding)
6.1.2. Method Activity Result APIs
You must register the callback by calling the registerForActivityResult method, which accepts the following parameters:
PreauthCardContract;ActivityResultCallback.
In ActivityResultCallback, you need to call the handleResult method, which can be used to process successful, erroneous payment results or cancel payment
Parameters of the handleResult method
| Parameter | Type | Description |
|---|---|---|
| successHandler | PaymentResultHandler.Success | Callback to process a successful result in which you can get a Payment Bill and payment method (with or without Google Pay) |
| failureHandler | PaymentResultHandler.Failure | Callback to process an erroneous result |
| cancelHandler | PaymentResultHandler.Cancel | Callback for payment cancellation processing (for example, when the user closes the SDK screen) |
To run 'CardPaymentActivity', you must call the launch method by passing SaveCardParams in the parameters.
Object SaveCardParam
| Parameter | Type | Description | Nullability |
|---|---|---|---|
| paymentParams | SaveCardParams | A set of options needed to save the map | Nonnull |
Example:
private ActivityResultLauncher<SaveCardParams> resultLauncher = registerForActivityResult(
	new PreauthCardContract(),
	result ->
		result.handleResult(
		     (successResult) -> {
                      handleBill(successResult.getBill());
                 },
		     (failureResult) -> {
                      handleError(
                           failureResult.getCode(),
                           failureResult.getMessage()
                      );
                 },
                 () -> {
                      handlePaymentCancel();
                 }
            )
	);

@Override
protected void onCreate(Bundle savedInstanceState) {
	super.onCreate(savedInstanceState);
      …
      payButton.setOnClickListener (
            button -> resultLauncher.launch(
                         new SaveCardParams(
                                  "1111",
                                  "test description",
                                  "test bill number"
                         )
            )
      );
}
6.2. Getting the result of card saving
After a successful payment, the Bill object will be created containing payment information.
Bill object
| Field | Type | Description | Nullability |
|---|---|---|---|
| billId | String | A unique payment ID | Nonnull |
| cardMask | String | The mask of the card used for payment containing the first six and the last four digits of the card number | Nonnull |
| payDate | long | Time of payment in milliseconds | Nullable |
| payeeName | String | The name of the company to which the payment was made | Nullable |
| token | String | Token value for the payment made | Nullable |
7. Payment by token
To make a payment, use a token received in one of two ways:
1) in response after successful payment (see Section 11.1 "Getting results after SDK closing");
2) by separate method of saving a card (see section 6 "Saving a card").
7.1. Initialization of payment by token
To open payment screen created at the SDK level (TokenPaymentActivity) you should by following methods
- via static method performTransaction;
- via Activity Result APIs.
7.1.1. Method performTransaction
This method is overloaded and takes Activity or Fragment as an argument.
performTransaction method parameters
| Parameter | Type | Description | Example |
|---|---|---|---|
| activity/fragment | Activity/Fragment | The Activity/Fragment object required to launch the payment screen and receive the payment result | |
| requestCode | int | A unique code to identify the result of the payment | 123 |
| params | TokenPaymentParams | Object with a set of parameters required for the payment by token | |
| showReceiptScreen | boolean | Displaying a screen with the receipt after successful payment. Default value: true (* available for SDK version 1.3.2 and higher) | |
| returnToDetailsAfterErrorEnabled | boolean | Return to entering payment details after an error. Default value: false (* available for SDK version 1.3.4 and higher) |
TokenPaymentParams object
| Field | Type | Description | Nullability |
|---|---|---|---|
| payeeId | String | A unique identifier (ID) of the payee company in the Portmone.com system | Nonnull |
| billNumber | String | A unique number of the payment | Nullable |
| shopBillId | String | Identifier of the invoice used to process a payment for an already created bill. If shopBillId is provided, the value of the preauthFlag parameter specified when creating the bill must match the value in the payment request. The shopBillId parameter must be placed after billNumber (or after payeeId if billNumber is not present). If shopBillId is not used, leave this field empty ("") — in this case, the system will work under standard settings. To correctly display the order number, payment description, and commission to the user, these details from the created shopBillId must also be duplicated in the parameters of the payment request. The use of this parameter is optional and required only when a payment is to be made for a previously created bill. | Nullable |
| preAuth | boolean | Payment with pre-authorization. Default value: false | Nullable |
| billCurrency | String | Currency of the payment. Only values from the Constant$BillCurrency set of constants are accepted. Possible values: UAH (default value), USD, EUR, GBP, KZT | Nullable |
| attribute1 | String | Payment attribute 1 | Nullable |
| attribute2 | String | Payment attribute 2 | Nullable |
| attribute3 | String | Payment attribute 3 | Nullable |
| attribute4 | String | Payment attribute 4 | Nullable |
| attribute5 | String | Payment attribute 5. Used to send the split parameters of the payment (see section "Splitting the payment" for details) | Nullable |
| billAmount | double | Amount of the payment | Nonnull |
| cardMask | String | The mask of the saved card | Nonnull |
| token | String | Token of the saved card | Nonnull |
| description | String | Payment description | Nonnull |
| onlyGooglePay | boolean | Payments via Google Pay only | Nullable |
| testEnvironment | boolean | Using test environment for Google Pay | Nullable |
| privatPayEnabled | boolean | Payment via the LiqPay system, with card selection from Privat24 Internet Banking. This parameter can only be used when invoking the constructor with Google Pay. If payment via LiqPay is not required, this parameter can be set to false. | Nonnull |
Note: The
attribute 1-5fields – optional fields for additional payment information.
Example:
final TokenPaymentParams testParamsWithoutGooglePay = new TokenPaymentParams(
    "1234",                 // payeeId
    "BILL-2025-1001",       // billNumber
    "2102095545",           // shopBillId
    false,                  // preAuth
    "UAH",                  // billCurrency
    "A1",                   // attribute1
    "A2",                   // attribute2
    "A3",                   // attribute3
    "A4",                   // attribute4
    "A5",                   // attribute5
    99.99,                  // billAmount
    "4444 33** **** 1111",  // cardMask
    "21312321321321321",    // token
    "Token pay no GP"       // description
);

final TokenPaymentParams testParamsWithGooglePay = new TokenPaymentParams(
    "1234",                 // payeeId
    "BILL-2025-1001",       // billNumber
    "2102095545",           // shopBillId
    false,                  // preAuth
    "UAH",                  // billCurrency
    "A1",                   // attribute1
    "A2",                   // attribute2
    "A3",                   // attribute3
    "A4",                   // attribute4
    "A5",                   // attribute5
    99.99,                  // billAmount
    "4444 33** **** 1111",  // cardMask
    "21312321321321321",    // token
    "Token pay GP",         // description
    true,                   // onlyGooglePay
    false,                  // testEnvironment
    false                   // privatPayEnabled
);


TokenPaymentActivity.performTransaction(
     this,
     111,
     testParamsWithGooglePay,
     false
);
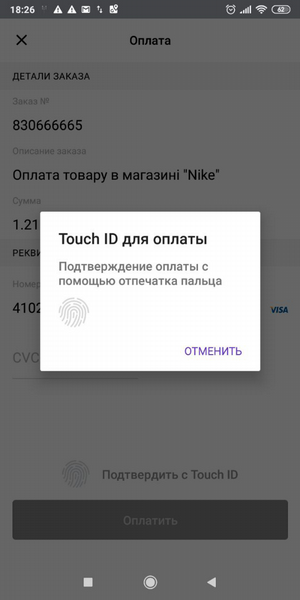
Fig. 5а. An example of displaying screen of making payment using token/ payment with Touch ID (without branding)
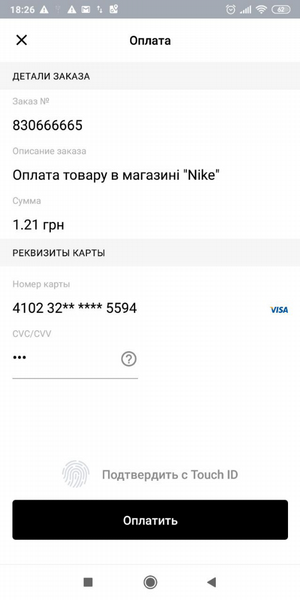
Fig. 5b. An example of displaying screen of making payment using token/ payment with Touch ID (without branding)
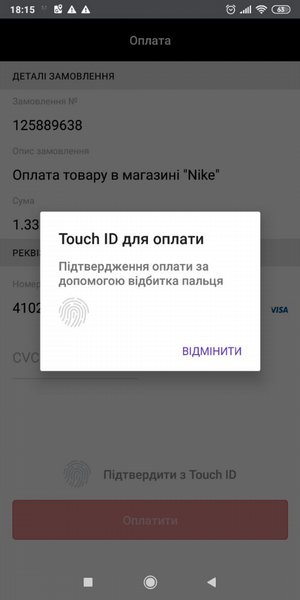
Fig. 6а. Screen of making payment using token/ payment with Touch ID (branding example)
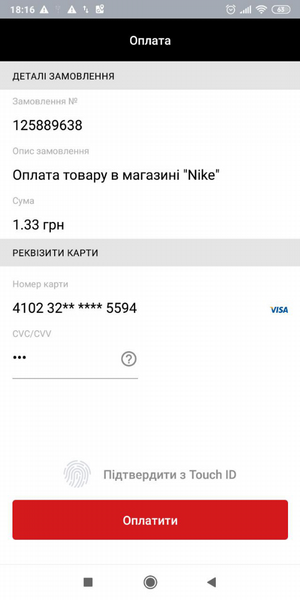
Fig. 6b. Screen of making payment using token/ payment with Touch ID (branding example)
7.1.2. Method Activity Result APIs
You must register the callback by calling the registerForActivityResult method, which accepts the following parameters:
TokenPaymentContract;ActivityResultCallback
In ActivityResultCallback, you need to call the handleResult method, which can be used to process successful, erroneous payment results or cancel payment
Parameters of the handleResult method
| Parameter | Type | Description |
|---|---|---|
| successHandler | PaymentResultHandler.Success | Callback to process a successful result in which you can get a Payment Bill and payment method (with or without Google Pay) |
| failureHandler | PaymentResultHandler.Failure | Callback to process an erroneous result |
| cancelHandler | PaymentResultHandler.Cancel | Callback for payment cancellation processing (for example, when the user closes the SDK screen) |
To run 'TokenPaymentActivity', you must call the launch method by passing TokenPaymentContractParams in the parameters.
Object TokenPaymentContractParams
| Parameter | Type | Description | Nullability |
|---|---|---|---|
| paymentParams | TokenPaymentParams | A set of parameters required for payment | Nonnull |
| showReceiptScreen | boolean | Option to turn off the display of the receipt saving screen after successful payment (default true) (* option available from SDK version 1.3.2) | Optional |
| returnToDetailsAfterErrorEnabled | boolean | Parameter with which you can prevent the return to the entry of details after the error (default false) (* option available from SDK version 1.3.4) | Optional |
Example:
private ActivityResultLauncher<TokenPaymentContractParams> resultLauncher = registerForActivityResult(
	new TokenPaymentContract(),
	result ->
		result.handleResult(
		     (successResult) -> {
                      handleBill(successResult.getBill());
                 },
		     (failureResult) -> {
                      handleError(
                           failureResult.getCode(),
                           failureResult.getMessage()
                      );
                 },
                 () -> {
                      handlePaymentCancel();
                 }
            )
	);

@Override
protected void onCreate(Bundle savedInstanceState) {
	super.onCreate(savedInstanceState);
      …
      payButton.setOnClickListener (
            button -> resultLauncher.launch(
                         new TokenPaymentContractParams(
	                           tokenPaymentParams,
	                           true,
	                           false
                         )
            )
      );
}
7.2. Getting the result of payment by token
After a successful payment, the Bill object will be created containing payment information.
8. Payment without CVV confirmation
(* function is available for SDK version 1.3.3 and higher)
SDK provides possibility to pay by token without using the CVV to confirm payment. This is possible for payments, which amount is less than or equal to the value set by the setBillAmountWithoutCvvConfirmation method.
For example:
PortmoneSDK.setBillAmountWithoutCvvConfirmation(100.0);
However, this feature is not available for transfer from token to card.
Please contact our Account Managers to enable payment without CVV confirmation
E-mail: [email protected]
9. Money transfer from card to card using token
Used to make a money transfer with a stored token of the sender card.
9.1. Initialization of money transfer by token
There are two ways to open a transfer screen created at the SDK (TokenTransferActivity) level:
- using the static method performTransaction;
- using Activity Result APIs.
9.1.1. Method performTransaction
This method is overloaded and takes Activity or Fragment as an argument.
performTransaction method parameters
| Parameter | Type | Description | Example |
|---|---|---|---|
| activity/fragment | Activity/Fragment | The Activity/Fragment object required to launch the payment screen and receive the payment result | |
| requestCode | int | A unique code to identify the result of the money transfer | 123 |
| params | TokenTransferParams | Object with a set of parameters required for the transfer by token | |
| showReceiptScreen | boolean | Displaying a screen with the receipt after successful payment. Default value: true (* available for SDK version 1.3.2 and higher) | |
| returnToDetailsAfterErrorEnabled | boolean | Return to entering payment details after an error. Default value: false (* available for SDK version 1.3.4 and higher) |
TokenTransferParams object
| Field | Type | Description | Nullability |
|---|---|---|---|
| payeeId | String | A unique identifier (ID) of the payee company in the Portmone.com system | Nonnull |
| shopBillId | String | Identifier of the invoice used to process a payment for an already created bill. The shopBillId parameter must be placed after billNumber (or after payeeId if billNumber is not present). If shopBillId is not used, leave this field empty ("") — in this case, the system will work under standard settings. The use of this parameter is optional and required only when a payment is to be made for a previously created bill. | Nullable |
| attribute2 | String | Payment attribute 2 | Nullable |
| attribute3 | String | Payment attribute 3 | Nullable |
| attribute4 | String | Payment attribute 4 | Nullable |
| billAmount | double | Amount of the payment. If not set, a client can manually set it on the payment screen | Nullable |
| cardMask | String | The mask of the saved card | Nonnull |
| token | String | Token of the saved card | Nonnull |
Note: The
attribute 2-4fields – optional fields for additional payment information.
Example:
final TokenTransferParams testParams = new TokenTransferParams(
    "1234",                 // payeeId
    "2102095545",           // shopBillId
    "B2",                   // attribute2
    "B3",                   // attribute3
    "B4",                   // attribute4
    50.00,                  // billAmount
    "4444 33** **** 1111",  // cardMask
    "21312321321321321"     // token
);

TokenTransferActivity.performTransaction(
     this,
     111,
     testParams,
     false
);
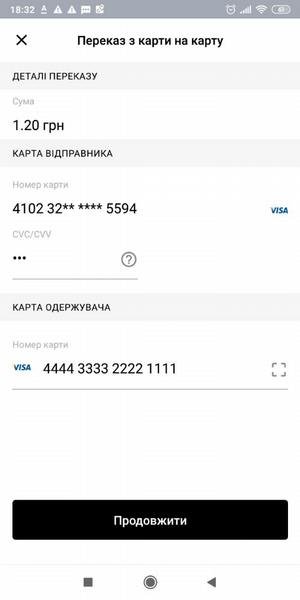
Fig. 7а. Money transfer screen from card to card (without branding)
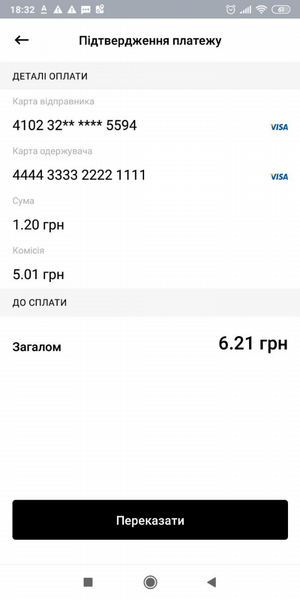
Fig. 7b. Money transfer screen from card to card (without branding)
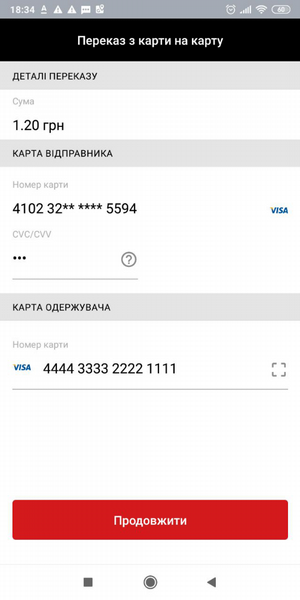
Fig. 8а. Money transfer screen from card to card (branding example)
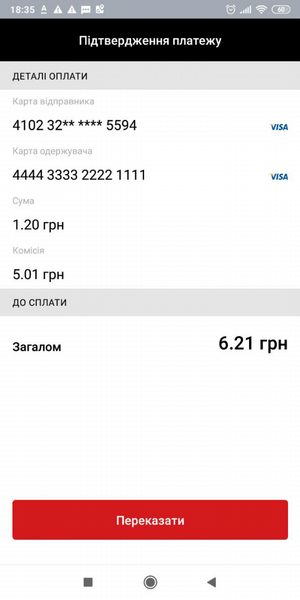
Fig. 8b. Money transfer screen from card to card (branding example)
9.1.2. Method Activity Result APIs
You must register the callback by calling the registerForActivityResult method, which accepts the following parameters:
TokenTransferContract;ActivityResultCallback.
In ActivityResultCallback, you need to call the handleResult method, which can be used to process successful, erroneous payment results or cancel payment.
Parameters of the handleResult method
| Parameter | Type | Description |
|---|---|---|
| successHandler | PaymentResultHandler.Success | Callback to process a successful result in which you can get a Payment Bill and payment method (with or without Google Pay) |
| failureHandler | PaymentResultHandler.Failure | Callback to process an erroneous result |
| cancelHandler | PaymentResultHandler.Cancel | Callback for payment cancellation processing (for example, when the user closes the SDK screen) |
To run 'TokenTransferActivity', you must call the launch method by passing TokenTransferContractParams in the parameters.
Object TokenTransferContractParams
| Parameter | Type | Description | Nullability |
|---|---|---|---|
| paymentParams | CardPaymentParams | A set of parameters required for payment | Nonnull |
| showReceiptScreen | boolean | Option to turn off the display of the receipt saving screen after successful payment (default true) (* option available from SDK version 1.3.2) | Optional |
| returnToDetailsAfterErrorEnabled | boolean | Parameter with which you can prevent the return to the entry of details after the error (default false) (* option available from SDK version 1.3.4) | Optional |
Example:
private ActivityResultLauncher<TokenTransferContractParams> resultLauncher = registerForActivityResult(
	new TokenTransferContract(),
	result ->
		result.handleResult(
		     (successResult) -> {
                      handleBill(successResult.getBill());
                 },
		     (failureResult) -> {
                      handleError(
                           failureResult.getCode(),
                           failureResult.getMessage()
                      );
                 },
                 () -> {
                      handlePaymentCancel();
                 }
            )
	);


@Override
protected void onCreate(Bundle savedInstanceState) {
	super.onCreate(savedInstanceState);
      …
      payButton.setOnClickListener (
            button -> resultLauncher.launch(
                         new TokenTransferContractParams(
	                           tokenTransferParams,
	                           true,
	                           false
                         )
            )
      );
}
9.2. Getting the result of transfer by token
After a successful payment, the Bill object will be created containing payment information.
10. Payment via Google Pay
(* function is available for SDK version 1.3.0 and higher)
Payment via Google Pay is available as an additional option when paying by card / by token.
For Google Pay payments add these fields to the PaymentParams/ TokenPaymentParams object:
| Field | Type | Description | Nullability |
|---|---|---|---|
| onlyGooglePay | boolean | Payments via Google Pay only | Nullable |
| testEnvironment | boolean | Using test environment for Google Pay | Nullable |
Important! Before you can start accepting real payments, you must reach out to Google support to request production access. The process is as follows:
- Merchant clicks here and upload their test SDK / or video of the process.
- Google will approve it and will whitelist their SDK for production.
- Merchant enables production SDK in their developer profile and publishes production version.
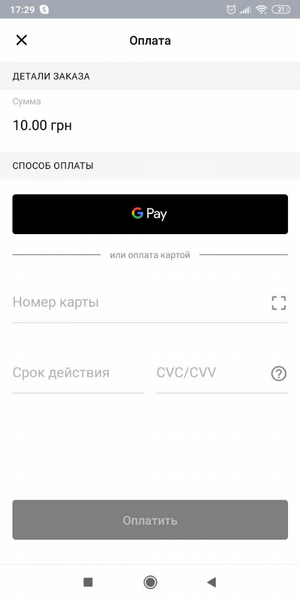
Fig. 9а. An example of displaying a payment screen with the ability to pay by card or via Google Pay (without branding)
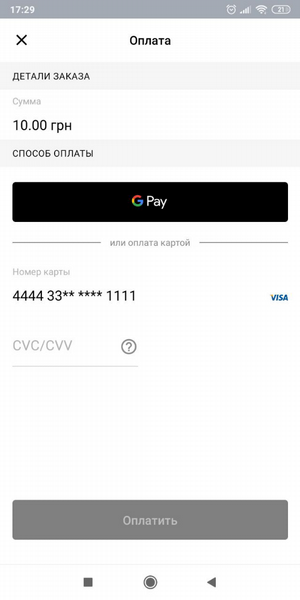
Fig. 9b. An example of displaying a payment screen with the ability to pay by card or via Google Pay (without branding)
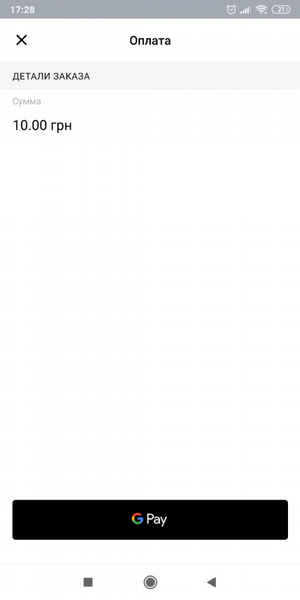
Fig. 10. An example of displaying a payment screen via Google Pay (without branding)
11. Getting payment results and errors in case of failure
11.1. Getting results after SDK closing
After a successful payment, the Bill object will be created containing payment information. The Bill object can be obtained using the following method of the corresponding Activity specified when calling the SDK, with the corresponding requestCode and resultCode - RESULT_OK:
onActivityResult(requestCode, resultCode, data)
You can receive the Bill object from the data object as Serializable extra using the Constant$ExtraKey.Bill key.
Bill object
| Field | Type | Description | Nullability |
|---|---|---|---|
| billId | String | A unique payment ID | Nonnull |
| status | String | Payment status. Possible values: “PAYED” and “PREAUTH”, depending on the type of payment selected at the initialization | Nonnull |
| billAmount | double | Amount of the payment | Nonnull |
| commissionAmount | double | Commission for the payment | Nullable |
| cardMask | String | The mask of the card used for payment containing the first six and the last four digits of the card number | Nonnull |
| recieptUrl | String | Link to get a pdf receipt | Nullable |
| contractNumber | String | Personal account number | Nullable |
| payDate | long | Time of payment in milliseconds | Nullable |
| payeeName | String | The name of the company to which the payment was made | Nullable |
| token | String | Token value for the payment made | Nullable |
Also in extra, you can get a boolean value of the type of payment using the Constant$ExtraKey.PAID_WITH_GOOGLE key. If true, the payment was made through Google Pay and the token of such payment cannot be used for further payment by token (with saved card).
If payment failed, resultCode - RESULT_CANCELED.
If error occurred, the error code and the error message can be obtained from extras using the Constant$ExtraKey.ERROR_CODE key and the Constant.ExtraKey.ERROR_MESSAGE key respectively.
Example:
@Override
protected void onActivityResult(
     final int requestCode, final int resultCode, @Nullable final Intent data
) {
  super.onActivityResult(requestCode, resultCode, data);
  if (requestCode == 111) {
     if (resultCode == RESULT_OK && data != null) {
        Bill bill = (Bill) data.getSerializableExtra(Constant$ExtraKey.BILL);
        Log.d("PaymentActivity", bill.toString());
     } else if (resultCode == RESULT_CANCELED) {
        if (data != null && data.hasExtra(Constant$ExtraKey.ERROR_CODE)) {
           int errorCode = data.getIntExtra(Constant$ExtraKey.ERROR_CODE, -1);
           String errorMessage = data.getStringExtra(Constant$ExtraKey.ERROR_MESSAGE);
           Log.d("PaymentActivity", "error code: " + errorCode + ", errorMessage: " + errorMessage);
        } else {
           //the user exited SDK without going through the entire payment flow
        }
     }
   }
}
11.2. Getting results directly from the SDK
(* function is available for SDK version 1.3.0 and higher)
You can receive payment results immediately after payment without waiting for the SDK to close and onActivityResult to be called. To do so, specify the appropriate static callback in the PortmoneSDK class:
public class PayActivity extends AppCompatActivity {
    @Override
    protected void onCreate(Bundle savedInstanceState) {
        super.onCreate(savedInstanceState);
        ...
        PortmoneSDK.setPaymentCallback(new PortmoneSDK.PaymentCallback() {
            @Override
            public void paymentSuccess(Bill bill,  boolean paidThroughGooglePay) {
               Log.d(TAG, "paymentSuccess bill = [" + bill + "], withGoogle: " + paidThroughGooglePay);
            }

            @Override
            public void paymentError(int code, String message) {
                Log.d("PayActivity", "paymentError called with: code = [" + code + "], message = [" + message + "]");
            }
        });
    }
    @Override
    protected void onDestroy() {
        super.onDestroy();
        PortmoneSDK.setPaymentCallback(null);
    }
}
12. Mass payment of utility bills
This method allows you to pay multiple bills that were found using an address search.
12.1 Saving a card
12.1.1 Obtaining credentials
It is necessary to make a POST request with the parameters of the user's login and password to receive credentials
https://www.portmone.com.ua/r3/api/merchant-bills
Request structure and example:
{
  "method":"getcred",
  "params": {
     "data": {
       "login": "Login,
       "password": "Password"
      }
  },
  "id":"1"
}
Response structure and example:
{
  "result": {
"credentials": "32397c10e4ccc5841ae706ed4b16d0eb42adce4e6890466663c140a017f6869c2a52f5d6384447"
  },
  "id": "1"
}
Important! Must be saved
credentials. When changing the password, it is necessary to generatecredentialsagain.
12.1.2 Saving the card for mass payment of utility bills
The mechanism of saving the card allows you to receive a token for further mass payment of bills with this card without specifying the number and date.
To open payment screen created at the SDK level (PreauthCardActivity) you should by following methods
- via static method performTransaction;
- via Activity Result APIs.
Method performTransaction
This method is overloaded and takes Activity or Fragment as an argument.
performTransaction method parameters
| Parameter | Type | Description | Example |
|---|---|---|---|
| activity/fragment | Activity/Fragment | The Activity/Fragment object required to launch the payment screen and receive the payment result | |
| requestCode | int | A unique code to identify the result of the payment | |
| params | SaveCardParams | Object with a set of parameters required for the card saving |
SaveCardBillsParams object
| Field | Type | Description | Nullability |
|---|---|---|---|
| contractNumber | String | User login | Nonnull |
| attribute1 | String | Credentials received in point 12.1.1 | Nullable |
| lang | String | Possible values: ukrainian, english | Nullable |
Example:
final SaveCardBillsParams saveCardBillsParams = new SaveCardBillsParams(
       "uk",
       "VERIFICATION",
       “Credentials”,
       “contractNumber”,
       "CREATE_TOKEN_BILL");
Activity Result APIs method
Similar to the Activity Result APIs method (clause 6.1.2), only the SaveCardBillsParams object
To launch PreauthPayBillsPreActivity, you need to call the launch method, passing the SaveCardBillsParams parameters.
As a result, we will receive a Bill object, where we are interested in the token property
private ActivityResultLauncher<SaveCardBillsParams> resultLauncher =
       registerForActivityResult(
       new PreauthCardBillsContract(),
       result -> {
           result.handleResult(
                   (successResult) -> {
                       tvResult.setText("Payment result:\n" + successResult.getBill().toString());
                       saveCardBills(successResult.getBill());
                       return null;
                   },
                   (failureResult) -> {
                       tvResult.setText("Payment error:\n" + "Code" + failureResult.getCode() +
                               "\n" + failureResult.getMessage());
                       return null;
                   },
                   () -> {
                       tvResult.setText("Payment has been cancelled");
                       return null;
                   });
       }
);
Please note! For further use in payment, the following parameters must be saved:
token,credentials,contractNumber
12.2. Mass payment of utility bills by token
12.2.1 Initialization of payment by token
To call the payment by token screen use the resultLauncher.launch(payBillsParams) method with the required parameters.
Example:
private ActivityResultLauncher<PayBillsParams> resultLauncher =
       registerForActivityResult(new MassPayContract(),
               result ->
                       result.handleResult((successResult) -> {
                                   tvResult.setText("Payment result, count payed bills:\n" + successResult.getBills().size());
                                   for (int i = 0; i < successResult.getBills().size(); i++) {
                                       tvResult.append("\nBillId = " + successResult.getBills().get(i).getBillId());
                                       tvResult.append("\nBillAmount = " + successResult.getBills().get(i).getBillAmount());
                                       tvResult.append("\nCommission = " + successResult.getBills().get(i).getCommission());
                                       tvResult.append("\nStatus = " + successResult.getBills().get(i).getStatus());
                                       tvResult.append("\nErrorCode = " + successResult.getBills().get(i).getErrorCode());
                                       tvResult.append("\nErrorMessage = " + successResult.getBills().get(i).getErrorMessage());
                                       tvResult.append("\n========================================");
                                   }
                               },
                               (failureResult) -> {
                                   tvResult.setText("Payment error:\n" + "Code" + failureResult.getCode() +
                                           "\n" + failureResult.getMessage());
                               },
                               () -> {
                                   tvResult.setText("Payment has been cancelled");
                               }));
As a result, we return an array of accounts, the status of each can be viewed.
BillsPaymentParams object
| Field | Type | Description | Nullability |
|---|---|---|---|
| contractNumber | String | User login | required |
| paymentBills | ArrayList<MassPayBill> | An array of bills for payment. The MassPayBill object includes 2 mandatory parameters, these are: |
id: String, (Example: “123456789”.) billAmount: Double, (Example: “1.00”.)| required| |credentials| String| received in 12.1.1| required| |googlePayEnabled| Boolean| Google Pay payment is available in the case of paying only one bill, if there are more bills - the set value will be false by default. (see example)| optional| |token| String| received in 12.1.2| required|
Error codes
| Error code | Description |
|---|---|
| 2000 | Payment amount less than 0 |
| 2001 | payeeId is empty |
| 2002 | Card number is empty |
| 2004 | Card expiration date is empty |
| 2005 | Card expiration date is invalid |
| 2006 | Verification error |
| 2007 | Getting commission error |
| 2008 | Verification code is empty |
| 2010 | CVV is empty |
| 2011 | CVV is invalid |
| 2023 | Card payment error or 2d verification error. An error occurs: - during the payment if order status is not PAYED or PREAUTH and no additional verification is required; - during 2d verification if order doesn't contain PAYED or PREAUTH status |
Testing
After registering in the Portmone.com system, you need to get the following information from your Account manager:
- the ID of your company in the Portmone.com system (
payee_id); - your company's private key - a value that you will use to create a unique signature of each request.
The Portmone.com system provides partners with two modes for testing: test mode and production mode with automatic payment cancellation.
The test mode of the payment gateway means that the Portmone.com system checks the validity of entered data from the Partner and its Client, creates an order, but payment card authorization is not performed. 3-D Secure check is not possible.
Cards for testing:
| Card number | Result |
|---|---|
| 4444333322221111 | Successful payment |
| 4111111111111111 | Failed payment |
The production mode with payment auto cancellation provides the possibility to make real payments using real payment cards. The cancellation of payment performed automatically within 30 minutes.
Please contact our Account Managers to enable and disable test mode or payment auto cancellation
Email: [email protected]
Important! Before putting the payment acceptance system into operation, make sure that the test mode or payment auto cancellation are disabled!